Wednesday, November 19, 2008

Cascading Drop downs in InfoPath Web Forms made easy

To create user‐friendly web forms, cascading drop down list boxes is a must, but InfoPath Form Services doesn’t allow you to use them, like you can use them with InfoPath Client.
(Filter Data on DataConnections/DataSources are not allowed with InfoPath Web Forms)


This article explains how to use Cascading Drop down list boxes within an InfoPath Web Form in a very easy and re-usable way.

Please download the PDF file containing the step by step guide

HOW_TO_use_Cascading_Dropdown_ListBoxes_within_an_InfoPath_Web_Form.pdf

HOW TO make InfoPath Forms Readonly when SharePoint Worflow is started

When users filling in an InfoPath Form and submit the form to a SharePoint library, a workflow can be started (ex. Approval). In many cases we don’t want the user changes information after the workflow is started.

This works with SharePoint Workflows and Nintext Workflows


Please download the PDF file containing the step by step guide:

HOW_TO_Make_InfoPath_Forms_Readonly_when_a_SharePoint_Workflow_is_started.pdf

Wednesday, October 29, 2008

Use Option Control to keep Preferred Opening View

Introduction

The next article describes how to use an option control, to save the preferred view when opening the InfoPath document;

Step by Step

1. Create your different views
2. Add a option control to view 1
3. Double Click the Option Controls, and set the Value when selected

4. Open the Form Options,  Menu Tools -> Form options
5. Select Open and Save item in the Category list
6. Click the Rules button in the Open behavior section
7. Click the Add button to create a new rule
8. Click the Rule Name to SwitchToView1
9. Click the Set Condition button
10. Select the Option Control Field in the first dropdown list box
11. Set the value of the Option 1 (See Value when selected) in the third col.
12.Click the Ok button

13. Click the Add Action button
14. Select Switch Views in the Action dropdown listbox
15.Select View 1
16. Repeat from Point 7 to 16  for all the other views.

.

How to populate a list with subdirectories of a SharePoint Library

Introduction

When creating subdirectories in SharePoint Library, you can’t submit directly to one the sub directories. Also when users add or change the subdirectories, how to handle this in InfoPath.


Compatibility

InfoPath 2003 and 2007: Full Support
Form Serices:  No Support

Designing the Form Template

  1. Create the Receiving Data Connection
    1. Go to Menu Tools ->Data Connections
    2. Click the Add button
    3. Select Receive data
    4. Select SharePoint library or list
    5. Enter the path to your SharePoint Site
    6. Select the Library
    7. Select Item and Content Type

clip_image002

Figure 1: Select Item and Content Type

    1. Set the name to SubDirectories
  1. Add the Dropdown list to your form
    1. Add a dropdown list box to the form
    2. Double-Click the newly added list box, to open the Properties Dialog Box
    3. Select ‘Look up values in a data connection ,….’ In the list box entries section
    4. Select SubDirectories in the Data Connection Dropdown listbox
    5. Click on the ‘Select xPath’ button clip_image003 next to the Entries textbox
    6. Select the repeating node from the list (= SharePoint Library Name)
    7. Click on the Filter Data button
    8. Select Content_Type in the first dropdown list box
    9. Enter the text Folder in the third dropdown list box

clip_image005

Figure 2: Filter Data settings

    1. Click 3x the Ok button
    2. Set Value and Display Name to @Item
    3. Click the Ok button
  1. Test the form

Submitting the form to the selected sub directory

  1. Create a Submit Connection to the main SharePoint Directory
    1. Go to Menu Tools ->Data Connections
    2. Click the Add button
    3. Select Submit data
    4. Select To a SharePoint library
    5. Enter the Path of the Main SharePoint Library
    6. Set the file name
    7. Click the Finish button
  1. Set the submitting options
    1. Go to Menu Tools ->Submitting forms
    2. Select Enable Submit Commands and buttons
    3. Select Custom Submit using form Code in the Submit to dropdown list box
    4. Select Edit Form Code
    5. Click the Ok button

clip_image006 Note:

The Microsoft script editor will open

Point f : is the code using InfoPath 2003

Poit g : is the code using InfoPath 2007

    1. Add the following code to the XDocument::OnSubmitRequest function

Code for InfoPath 2003

//-- Create string objects for each field we will use to modify the FolderUrl –

var xnLocation = XDocument.DOM.selectSingleNode("my:myFields/my:DynamicInfo/my:xnLocation").text;

//-- Get a reference to the submit data connection –

var fc = XDocument.DataAdapters["Submit"];

//-- Modify the Submit connection URL we want to submit to by concatenating the //-- xnLocation and xnFolderName values –

fc.FolderURL = fc.FolderURL + "/" + xnLocation;

//-- Execute the submit connection –

try

{

fc.Submit();

eventObj.ReturnStatus = true;

}

catch(ex)

{

eventObj.ReturnStatus = false;

}

    1. Add the following code to the FormEvents_Submit function

Code for InfoPath 2007

try

{

// Get a reference to the form's XmlNamespaceManager object.

XmlNamespaceManager ns = this.NamespaceManager;

// Create an XPathNavigator object for the form's main data

// source.

XPathNavigator xnDoc = this.MainDataSource.CreateNavigator();

XPathNavigator xnCountry =

xnDoc.SelectSingleNode("/my:myFields/my:country", ns);

if (xnCountry != null)

{

FileSubmitConnection dc =

(FileSubmitConnection)this.DataConnections["Main submit"];

if (dc != null)

{

dc.FolderUrl = dc.FolderUrl + "/" + xnCountry.Value;

dc.Execute();

e.CancelableArgs.Cancel = false;

}

}

}

catch (Exception ex)

{

e.CancelableArgs.Message = "There was a problem submitting the

form:\n\n" + ex.Message;

e.CancelableArgs.Cancel = true;

}

    1. Save and Close the Microsoft Script Editor
    2. Finish the InfoPath 2003 form with the other business requirements
    3. Publish the Form Template to the SharePoint document library or document libraries

Monday, October 27, 2008

Create Personal SharePoint Views depending on an InfoPath field using [Me]

This article is a continue on the previous article "HOW TO Populate a List with the SharePoint Users"
Download

To download both articles, please click on the following link:

HOW_TO_Populate_a_List_with_the_SharePoint_Users.pdf

Problem

When publishing the previous form to SharePoint, and you promote the field Assign To, you will notice the newly created column is of type: Single line of Text.

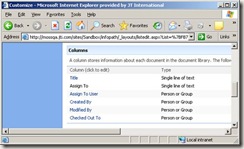
clip_image001clip_image003

Figure 3: View of columns.

When you want to filter this view, using [Me], you will receive an error
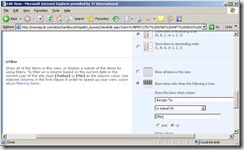
clip_image005

Figure 4: Edit View page, Set Filter.

The error you receive is: The value is not a valid text string

clip_image007

Figure 5: Error Message.


Solution

In general, we need to add a new column and create a SharePoint Workflow with the SharePoint Workflow Designer

  1. Add a new column to the View

- Open the Form Library Settings page

- Click on Create Column in the Columns Section

- Enter Assign To User as Column name

- Select Person or Group as the type of the column

- Click on the Ok button

  1. Create Workflow

- Open the SharePoint Designer

- Create a new workflow (Menu File ->New -> Workflow)

- Set the workflow name: SetAssignToUserField

- Select the SharePoint list where the workflow should be attached to

- Select Automatically start this workflow when a new item is created checkbox

- Select Automatically start this workflow when a new item is changed checkbox
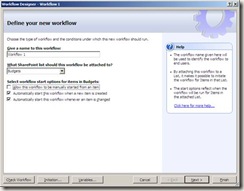
clip_image009

Figure 5: Define Workflow, step 1.

- Enter the Step 1 name: SetAssignToUser

- Select Set Field in Current Item under the Actions

- Click on Field and select Assign To User (the newly created column in the SharePoint View)

- Click on Value, click on the Display Data Binding Fx button

- Select Current Item as Source

- Select Assign To in the Field dropdown box
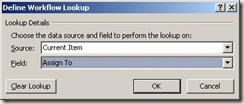
clip_image011

Figure 6: Define Workflow Lookup Dialog Box

clip_image012 Note:

Note that we just link the Assign To field (Created by InfoPath and keeps the User ID) to the Assign User To column, which is of a Person Group type.

SharePoint will execute the lookup automatically and will shows the Display Name in the view

- Click the Finish button

  1. Add the filter

- Go back to the SharePoint List

- Modify the Current View

- Select Show Items only when the following is True radio button, under the filter Section

- Select Assign User To from the Show the items when column dropdown box

- Enter in the value textbox [Me]
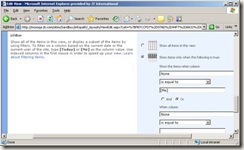
clip_image014

Figure 7: Filter Settings of the View

- Click on the Ok Button

HOW TO Populate a List with the SharePoint Users

Introduction

In many cases, when filling in a form, some of the data must be user names. Users coming from SharePoint as you work together in a Team.

A possible scenario is to assign forms to colleagues like tasks or to use with a workflow within InfoPath.

This article will explain how to fill in a dropdown list with the SharePoint Users

Download

HOW_TO_Populate_a_List_with_the_SharePoint_Users.pdf

Compatibilty

Most of the information will be showed in a table and using symbols.

InfoPath 2003 clip_image001[4] Full support
InfoPath 2007 clip_image001[4] Full support
Desktop Browser clip_image002 No support
Mobile device browser clip_image002 No Support

Designing the Form

  1. Create a Receive Data Connection
    1. Go to Menu Tools -> Data Connections…
    2. Click the Add… button
    3. Select Receive data option
    4. Select SharePoint library or List
    5. Enter the Ur l of a SharePoint Site
    6. Select the Library or List

clip_image001 Note:

You can select any Library or Form, as we are going to change it later. The easiest way is to select a Library or list who has Title and ID as columns.
In case you don’t have Title, select Item

    1. Select only Title and ID (or Item and Id, see note above)
    2. Change the name of the Data Connection to SharePoint Users

clip_image003

Figure 1: Data Connection Wizard, selecting the columns

  1. Extract the Form Files
    1. Goto menu File -> Extract Form Files
    2. Select the folder to save the extracted form files
  2. clip_image005

  3. Figure 2: Browse for folder dialog box.

    1. Click Ok
    2. Close the InfoPath Designer
    3. Open the folder with the extracted files
    4. Open with Notepad the file Manifest.xsf
    5. Search for sharepointGuid
    6. Change the Guid with UserInfo

Code:

<xsf:dataObjects>

<xsf:dataObject name="SharePoint Users" schema="SharePoint Users.xsd" initOnLoad="yes">

<xsf:query>

<xsf:sharepointListAdapter siteUrl="http://mossqa.silversands.com/sites/Sandbox/infopath/" sharepointGuid="{799BD477-5183-4FAB-AE75-A9C45C870D4B}" infopathGroup="File_Attachments" queryAllowed="yes" submitAllowed="no" name="SharePoint Users">

<xsf:field sharepointName="Title" infopathName="Title"></xsf:field>

<xsf:field sharepointName="ID" infopathName="ID"></xsf:field>

</xsf:sharepointListAdapter>

</xsf:query>

</xsf:dataObject>

</xsf:dataObjects>

Change to

<xsf:dataObjects>

<xsf:dataObject name="SharePoint Users" schema="SharePoint Users.xsd" initOnLoad="yes">

<xsf:query>

<xsf:sharepointListAdapter siteUrl="http://mossqa.silversands.com/sites/Sandbox/infopath/" sharepointGuid="UserInfo" infopathGroup="File_Attachments" queryAllowed="yes" submitAllowed="no" name="SharePoint Users">

<xsf:field sharepointName="Title" infopathName="Title"></xsf:field>

<xsf:field sharepointName="ID" infopathName="ID"></xsf:field>

</xsf:sharepointListAdapter>

</xsf:query>

</xsf:dataObject>

</xsf:dataObjects>

    1. Right-click on Manisfest.xsf and Select design to re-open the form in Design mode
  1. Populate the Dropdown with the UserInfo
    1. Add a Dropdown list onto the Form
    2. Set the Field Name
    3. Select Look up values from an external datasource
    4. Select SharePoint Users in the Data Source drop down
    5. Select the repeating node using clip_image006 button next to the Entries textbox
    6. Set Value to @ID, by using the clip_image006[1] next to the Value textbox
    7. Set Value to @Name, by using the clip_image006[2] next to the Display name textbox
  1. Test the form, your doprodown box will be filled with the SharePoint Users

Conclusion

This article described how to populate a dropdown list box 8or other list boxes) with the users from SharePoint.

There are other ways of doing this, like using a web services, but this way you can keep everything in the design mode of the form

Monday, October 20, 2008

Data validation, Filter Data: Case Sensitive

When you add data validation or you want to filter data, you already saw that the conditions are Case Sensitive.

Example:
When you have a text box and you don't want the user to fill in the value abc.  When adding the Data validation Field 1 equal to "abc", then show message box.

When the user enter ABC, the message box isn't popped up.

Solution:

There is no uppercase or lowercase available in InfoPath, the easiest way to reach or goal is to use the Translate function:

So the data validation rule will be:

- Select The Expression in the first dropdown
- Add the following condition to the Expression Textbox

translate(., "ABCDEFGHIJKLMNOPQRSTUVWXYZ", "abcdefghijklmnopqrstuvwxyz") = "abc"


This way of working can be used also to Filter Data.